3. Practical 1: Pre-Setup - ROS2 Installation, Intro to ROS2 and Development Workflow
- 3. Practical 1: Pre-Setup - ROS2 Installation, Intro to ROS2 and Development Workflow
- 3.1 Tasks
- 3.2 Installation
- 3.3 A Brief Introduction to ROS
- 3.3.1 Why does ROS exist?
- 3.3.2 What is ROS
- 3.3.3 ROS concepts through an example
- 3.3.4 ROS2 vs ROS1
- 3.3.5 ROS2 in Practice - Workflow Concepts
- 3.3.6 Nodes
- 3.3.7 Topics
- 3.3.8 Services
- 3.3.9 Parameters
- 3.3.10 Launching ROS2 Systems
- 3.3.11 Debugging Workflow
- 3.3.12 Common ROS2 Issues
- 3.3.13 Recommended Development Practices
- 3.4 About Gazebo
This page introduces ROS2 as a development and debugging workflow, not just a dependency to install. The objective is to ensure that you can build, run, inspect, and debug ROS2 systems efficiently, which is essential for aerial robotics development.
The course uses ROS2 Humble on Ubuntu 22.04.
3.1 Tasks
This practical introduces the core ROS2 development workflow that will be used throughout the module:
create → build → source → run → inspect → debug
Complete all tasks in order. Do not skip tasks, as later steps depend on earlier setup.
For reference: ROS2 tutorials ROS2 Tutorials
3.1.1 Task 1 – Verify Your ROS2 Environment
Purpose
Before working with ROS2, you must confirm that your system is correctly configured. Many ROS2 issues arise from environment problems rather than code errors.
What to do
- Open a new terminal
- Confirm your Ubuntu version
- Check that ROS2 is installed and accessible
- Identify the active ROS2 distribution
- Run a basic ROS2 command
3.1.2 Task 2 – Create and Build a ROS2 Workspace
Purpose
All ROS2 development takes place inside a workspace. Understanding workspace structure and build behaviour is essential for all future practicals.
What to do
- Create a new ROS2 workspace with a
srcdirectory - Build the workspace using
colcon - Source the workspace
- Verify that the workspace overlay is active
3.1.3 Task 3 – Create a ROS2 Package
Purpose
In ROS2, packages are the fundamental unit of software organisation. Every node, launch file, and library lives inside a package.
What to do
- Create a new ROS2 package inside the
srcdirectory - Rebuild the workspace
- Source the workspace again
- Confirm that ROS2 can discover your package
3.1.4 Task 4 – Run and Inspect ROS2 Nodes
Purpose
ROS2 systems consist of multiple nodes communicating via topics. You must be able to inspect a running system to understand and debug behaviour.
What to do
- Run a ROS2 demo node
- Open a second terminal to inspect the system
- List all running nodes
- List active topics
- Inspect one topic to identify its message type
3.1.5 Task 5 – Debug a Common ROS2 Workflow Error
Purpose
This task demonstrates a very common ROS2 error caused by missing environment setup.
What to do
- Stop the running node
- Open a new terminal without sourcing any setup files
- Attempt to run the same node
- Observe the error message
- Fix the issue by sourcing the correct setup file
- Rerun the node successfully
3.1.6 Task 6 – Verify Gazebo Installation
Purpose
Gazebo will be used in later practicals for simulation. You must confirm that it is correctly installed and can launch on your system.
What to do
- Check that Gazebo is installed
- Launch Gazebo from the terminal
- Confirm that it opens successfully
- Close Gazebo cleanly
If Gazebo does not launch correctly, note the error message and inform the teaching team. Do not attempt advanced graphics fixes during the session.
3.2 Installation
3.2.1 Installation ROS2 Humble
All instructions assume Ubuntu 22.04. If you are using WSL 2 or a virtualised environment, ensure this is configured correctly before proceeding.
For full installation details, refer to the official documentation:
https://docs.ros.org/en/humble/Installation/Ubuntu-Install-Debs.html
Update your system:
sudo apt update
sudo apt upgrade
# Check and set the locale to UTF-8
locale
sudo apt update && sudo apt install locales
sudo locale-gen en_US en_US.UTF-8
sudo update-locale LC_ALL=en_US.UTF-8 LANG=en_US.UTF-8
export LANG=en_US.UTF-8
locale  # Verify settings
# Install required packages
sudo apt install software-properties-common
sudo apt install python3-colcon-common-extensions
sudo add-apt-repository universe
sudo apt update
sudo apt install curl -y
# Download and add the ROS2 GPG key
sudo curl -sSL https://raw.githubusercontent.com/ros/rosdistro/master/ros.key -o /usr/share/keyrings/ros-archive-keyring.gpg
# Add the ROS2 repository to your sources list
echo "deb [arch=$(dpkg --print-architecture) signed-by=/usr/share/keyrings/ros-archive-keyring.gpg] http://packages.ros.org/ros2/ubuntu $(. /etc/os-release && echo $UBUNTU_CODENAME) main" | sudo tee /etc/apt/sources.list.d/ros2.list > /dev/null
You will need to install both the desktop and build tools
sudo apt install ros-humble-desktop
sudo apt install ros-dev-tools
3.2.2 Environment Configuration - Source ROS2 Automatically
ROS2 relies on environment setup. If this step is incorrect, ROS commands will not function. To do this, it is recommended that you add the startup script to your ~/.bashrc script
- Open .bashrc and edit the file
nano ~/.bashrc
The bashrc file should have been opened, then scroll to bottom of bashrc and append the following to the end, save (Ctrl+O) and exit (Ctrl+X)
source /opt/ros/humble/setup.bash
This will ensure that ROS2 is auto-enabled for all terminals which you setup. Ensure your system uses UTF-8, install the required packages, and add the official ROS2 repository.
You can also edit .bashrc in the terminal without opening the file. This will add new entries to the bottom of the file.
-Restrict ROS communication to the local machine (recommended for teaching labs):
echo 'export ROS_LOCALHOST_ONLY=1' >> ~/.bashrc
-Apply the changes:
source ~/.bashrc
-Verify:
ros2 --version
Expected output should reference humble.
Note: In our tutorials please set
ROS_LOCALHOST_ONLY=1otherwise everybody's ROS traffic will interfere with everybody else in the class! Outside of class we would usually segregate ROS traffic only its own network to avoid interference.
3.2.3 Installing Ignition Gazebo Fortress
Gazebo is the simulation environment that is most often used with ROS2. There are many different versions of gazebo - for us we are using the new version designed for Ubuntu 22.04 known as Gazebo Fortress.
The recommended compatible gazebo version for Ubuntu 22.04 and Humble is Fortress where installation instructions are here. But in short:
sudo apt-get update
sudo apt-get install lsb-release wget gnupg

sudo wget https://packages.osrfoundation.org/gazebo.gpg -O /usr/share/keyrings/pkgs-osrf-archive-keyring.gpg
echo "deb [arch=$(dpkg --print-architecture) signed-by=/usr/share/keyrings/pkgs-osrf-archive-keyring.gpg] http://packages.osrfoundation.org/gazebo/ubuntu-stable $(lsb_release -cs) main" | sudo tee /etc/apt/sources.list.d/gazebo-stable.list > /dev/null
sudo apt-get update
sudo apt-get install ignition-fortress
You can check succesful installation by using the ign cli command
3.3 A Brief Introduction to ROS
This section is adapted from this article
ROS stands for the Robot Operating System, yet it isn't an actual operating system. It's a framework designed to expedite the development time of robot platforms. To understand what ROS is, we should understand why ROS exists in the first place.
3.3.1 Why does ROS exist?
In general, software developers avoid hardware like the plague. It's messy, doesn't have consistent behavior, and there's no ctrl-z in sight.
Most beginner programmers think you have to have a deep knowledge of electronics and even mechanics to program robots. They think that the hardware and software are so tightly coupled, you have to know both in depth to build anything useful.
Software developers became software developers for a reason, so they don't have to deal with hardware. For example, let's say you have to debug a faulty sensor. You first have to take out the sensor from the enclosure, test the sensor thoroughly with a multi meter and various test cases, document its behavior, then examine the hardware -level code to ensure that there were no bugs, and so on. That's a lot of interaction with the hardware that's not fun for someone who just wants to write some cool software.
It's harder to attract good programmers if the programming is coupled deeply with hardware. This is where ROS comes into play. With ROS, you can completely abstract the hardware from software, and instead interact with an API that gives access to that data. You can forget about the hardware, and focus on developing the software that makes the robot do what you want.
3.3.2 What is ROS
ROS is essentially a framework that sits on top of an operating system which defines how particular ROS compatible programs communicate and share data with each other. Essentially ROS defines an interface between which compatible programs can communicate and interact with each other. Over the years that ROS has existed, many people have developed thousands of ROS compatible packages which can be used in a modular fashion.
3.3.3 ROS concepts through an example
To make it more concrete, imagine that on your drone you have a camera. There are also two processes which require, as inputs, that camera image. Say, a machine learning program, and a position estimation program. Traditionally, you would have to manually serialise (compress) and stream the image over a port which the other two programs could read from. But if the port changes or, say, the camera changes, lots of things have to be reconfigured.
However, this sort of interaction can be made streamlined in ROS. Let us consider the programs we have as ROS nodes, i.e. a program which is responsible for one single modular purpose, with particular inputs or outputs:
- A camera image streaming node
- OUT: camera image
- A machine vision system for recognising objects
- IN: camera image
- OUT: list of recognised objects
- A simultaneous localisation and mapping system.
- IN: camera image
- OUT: vehicle position
These outputs of a node define ROS topics, i.e. a single stream of one type of data. Each topic has a particular name which can be referred to. In our example, some of the topics might be:
/drone/camerafor the camera image/drone/recognised_objectsfor the machine vision system/drone/slam_positionfor the SLAM system
Then, we see that there are two avenues of communication created from these node inputs and outputs.
Now ROS follows a publisher/subscriber model of communication. What that means is that nodes publish data to topics as outputs. But that data is only sent across the network if a different nodes also subscribes to the same topic. So in our example we end up having
- A camera image streaming node
- OUT: publishing to
/drone/camera
- OUT: publishing to
- A machine vision system for recognising objects
- IN: subscribed to
/drone/camera - OUT: publishing to
/drone/recognised_objects
- IN: subscribed to
- A simultaneous localisation and mapping system.
- IN: subscribed to
/drone/camera - OUT: publishing to
/drone/slam_position
- IN: subscribed to
Finally, the data that is sent is not just anything. The data or message is a specifically templated packet of data containing things specified for that paricular use case. In our example for /drone/slam_position topic, the message might be of type geometry_msgs/msg/Point.msg which is defined like so:
# This contains the position of a point in free space
float64 x
float64 y
float64 z
In other words the message that the /drone/slam_position topic publishes must have a msg.x, msg.y and msg.z field, and the subscriber will only receivea message with those fields. There are a number of messages in the standard ROS library, but many libraries also define their own - as have we in some parts of Starling.
This can be summarised in this diagram from the ROS tutorials demonstrates it very nicely:
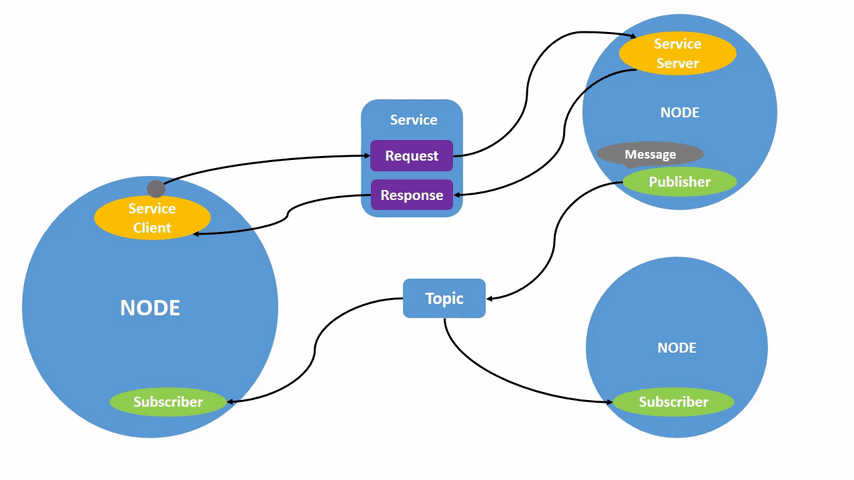
The bottom half of this shows how topics get sent from a publisher to a subscriber.
Interestingly, if you put two topics together, you get some notion of two way communication. This is the basis of a service which can be seen in the top of the diagram. A service is made of a Request topic and a Response topic, but functions as a single communication type to the user. Similar to messages, a service has a defined request and response types (e.g. see std_srvs/srv/SetBool.srv). A service request will often wait until a response is received before continuing.
Then if you combine two services and a topic, you can imitate a request for something which takes time. This in ROS is known as an action. For example requesting a robot to move from one location to another. You first request the move, which you get a response as to whether its started. This is followed by constant feedback along a particular topic. Then ended with a task complete service response. In this a whole set of messages are defined.
Note that everything happens asyncronously and in parallel, when a node subscribes or sends a requests, it doesn't know when the response will arrive. It only knows it will (hopefully) arrive at some point. When a packet is received the subscriber can then run a method - this method is usually known as a callback, but that will be covered in a later tutorial.
Finally, each node is configured by a set of parameters which are broadcast to all other nodes. Parameters are often configuration values for particular methods in a node, and can sometimes be changed on startup (or dynamically through a service), to allow the node to provide adjustable functionality. For example the value of a timeout or frequency of a loop.
So in summary, the key concepts and terminology are:
- Nodes
- Topics
- Publishers and Subscribers
- Messages
- Services
- Actions
- Parameters
3.3.4 ROS2 vs ROS1
There are 2 versions of ROS: ROS1 and ROS2. ROS1, initially created in 2007 by Willow Garage, has become huge among the open source robotics community. However over the years they realised that there are a number of important features which are missing - and adding all of these would simply break ROS1. Also the most recent ROS1 distribution (ROS Noetic) is soon to reach the end of its supported life (EOL 2025) with no more ROS1 there after! (See this article for more details!)
Therefore, to future proof the system, and to ensure all users get a well rounded experience that will hopefully translate to industry experience, Starling has been implemented in ROS2. Specifically, this tutorial uses the Humble Hawksbill (AKA Humble) Long Term Support (LTS) distribution throughout.
There are some interesting changes between ROS1 and ROS2, but the core elements described above remain identical. For those interested, ROS2 follows a much more decentralised paradigm, and does not require a central ROSnode as it uses the distributed DDS communication protocol for its internal communication. All nodes therefore broadcast their own topics allowing for easy decentralised discovery - perfect for multi-robot applications.
Note: Main thing to be aware of is if you are debugging and searching for ROS questions on the internet, be aware that there are many existing questions for ROS1 which will no longer apply for ROS2.
3.3.5 ROS2 in Practice - Workflow Concepts
In this course, to recap, ROS2 should be understood as a distributed software framework that allows multiple processes to communicate in a structured and inspectable way. Rather than treating ROS2 as a black box, you are expected to understand how to observe and reason about a running system.
The concepts below are the minimum required to develop, debug, and extend ROS2-based systems.
3.3.6 Nodes
A node is an executable process that performs computation. In practice, nodes typically implement: - perception (e.g. sensor processing) - estimation (e.g. localisation) - control (e.g. flight commands) - coordination and logic
Each node runs independently and communicates with other nodes using ROS2 communication primitives.
Common inspection commands:
ros2 node list
ros2 node info /node_name
Use these to: - confirm a node has launched successfully - check which topics, services, and parameters a node uses - diagnose crashes or missing functionality
3.3.7 Topics
Topics Topics are asynchronous data streams used for continuous data flow. Typical examples include: - sensor measurements - state estimates - control commands
Topics follow a publish–subscribe model: - publishers send messages - subscribers receive messages - communication is decoupled and non-blocking
Common inspection commands:
ros2 topic list
ros2 topic echo /topic_name
ros2 topic hz /topic_name
Use topics to: - verify that data is being produced - inspect message values in real time - confirm expected update rates
If a robot appears unresponsive, checking topics is often the first debugging step.
3.3.8 Services
Services provide synchronous, request–response communication. Unlike topics, services:
- block until a response is received
- are typically used for discrete actions
Common uses include: - enabling or disabling controllers - resetting systems - switching operating modes
Inspection commands:
ros2 service list
ros2 service type /service_name
ros2 service call /service_name <service_type> <request>
Services are particularly useful for testing system behaviour interactively.
3.3.9 Parameters
Parameters are runtime configuration values associated with nodes. They allow you to modify system behaviour without recompiling code.
Typical uses: - controller gains - thresholds and limits - enabling or disabling features
Inspection commands:
ros2 param list
ros2 param get /node_name parameter_name
ros2 param set /node_name parameter_name value
Parameters are a key mechanism for tuning aerial robotics systems during experimentation.
3.3.10 Launching ROS2 Systems
Realistic robotics systems consist of multiple nodes that must be started in a coordinated way. ROS2 uses launch files to manage this process.
A launch file typically: - starts multiple nodes - sets parameters - configures namespaces and remappings - controls logging and output
Example:
ros2 launch <package_name> <launch_file>.py
When using launch files: - always monitor terminal output - warnings and errors often indicate misconfiguration - a successful launch does not guarantee correct behaviour
Learning to read and interpret launch output is an essential skill.
3.3.11 Debugging Workflow
When a ROS2 system does not behave as expected, debugging should be systematic, not trial-and-error. Use the following workflow as your first response:
1: Check the Environment
echo $ROS_DISTRO
Ensure the correct ROS distribution is sourced.
- Check Node Execution
ros2 node list
If a node is missing: - it may have failed to launch - it may have crashed - it may not be included in the launch file
3: Check Data Flow
ros2 topic list
ros2 topic echo /topic_name
Confirm: - expected topics exist - messages are being published - values are reasonable
4: Check Parameters
ros2 param list
Incorrect or missing parameters are a common source of failures.
5: Inspect Logs
ls log/
Logs often contain detailed error messages not visible in the terminal.
This workflow resolves the majority of ROS-related issues encountered in this module.
3.3.12 Common ROS2 Issues
- ROS Commands Not Found
Cause: - ROS environment not sourced
Symptom:
ros2: command not found
Fix:
source /opt/ros/humble/setup.bash
- Nodes Cannot Communicate Cause:
- network interference (VPNs, firewalls)
- incorrect DDS configuration
Fix: - disable VPNs - ensure ROS_LOCALHOST_ONLY=1 is set for lab work
- Workspace Changes Have No Effect Cause:
- workspace not rebuilt
- workspace not sourced
Fix:
colcon build
source install/setup.bash
- Silent Failures Cause:
- node crashes after launch
- launch file continues running
Fix: - carefully inspect terminal output - check log files
3.3.13 Recommended Development Practices
To work efficiently with ROS2: - Treat ROS tools as diagnostic instruments - Build and test incrementally - Use multiple terminals: - one for launching systems - one or more for inspection
- Keep workspaces minimal and organised
- Avoid unnecessary complexity early on
These practices reflect how ROS2 is used in both research and industry settings.
3.4 About Gazebo
Gazebo Fortress is a powerful and widely used open-source robotics simulation tool that allows developers and researchers to test, design, and validate their robots in virtual environments before deploying them in the real world. It provides a highly realistic simulation environment, complete with accurate physics, sensor emulation, and 3D visualization. Gazebo Fortress is the latest release in the Gazebo simulation suite, offering enhanced features such as improved physics engines, better integration with ROS2, and support for multi-robot systems. Students can use Gazebo to simulate everything from autonomous drones navigating complex environments to robotic arms performing precision tasks, all without the risk of damaging physical hardware. One of its standout features is the ability to create custom worlds and robots, making it a versatile tool for exploring robotics concepts and conducting experiments. Gazebo’s tight integration with ROS2 also allows students to seamlessly test ROS2-based algorithms and systems within the simulator, bridging the gap between virtual testing and real-world implementation.
Technically, Gazebo operates as a standalone simulation engine but shares key concepts with ROS2, including the use of the publish-subscribe architecture. In Gazebo, simulation components such as sensors, robots, and environmental factors communicate through topics, similar to ROS2 nodes. This allows for seamless integration between ROS2 and Gazebo, where ROS2 nodes can subscribe to Gazebo topics (e.g., sensor data) or publish commands (e.g., velocity or actuator inputs). The system we use in this course makes heavy use of Gazebo as the simulation platform for drone activities to enable development. It will not be likely that you will interact with Gazebo direcly, and instead through a ROS2 interface, however having some context is useful!